How to Update WordPress Plugins Without Breaking Your Site
That red “Update Available” badge is staring at you right now, isn’t it? You know you should click it. But the last time you did, your contact form disappeared, your layout shifted, or your checkout page threw an error. And you spent 2 hours panic-Googling how to undo it.
I’ve been through that exact scenario more times than I’d like to admit. After breaking my own sites enough times, I landed on a process that takes about 5 extra minutes per update round and has saved me hours of debugging. The trick is simple: update one plugin at a time, and always have a rollback plan ready.
For this update, I also broke a plugin on purpose on my WordPress 7.1 test site to see what WordPress does about it now. It does more than most people realize, and I’ll show you exactly what you’ll see.
Why Do Plugin Updates Break Things?
It’s not random. There’s a pattern to why updates cause problems, and understanding it makes the whole process less scary.
Here’s what usually happens. Plugin A releases an update that changes how it handles something – maybe it restructures its CSS, renames a function, or updates a database table. Plugin B still expects the old behavior. They clash, and something visible breaks: your page layout shifts, a form stops sending emails, or your WooCommerce checkout throws an error.
This is completely normal, and it’s not your fault. Plugin developers can’t test against every other plugin out there – the WordPress directory listed 75,497 plugins when I checked its API in October 2026. Conflicts happen. But they’re manageable if you update the right way.
The One-by-One Rule
WordPress makes it tempting to select all plugins and click “Update” in one go. Don’t do this. Ever.
If you update 8 plugins at once and something breaks, you have no idea which of the 8 caused the problem. You’d have to deactivate them one by one, test after each change, and slowly narrow it down. That turns a 5-minute fix into a 45-minute investigation.
Instead, update one plugin, then check your site. Load the homepage, check a blog post, and test any critical feature (your contact form, checkout page, or membership login). If everything works, move to the next plugin. If something breaks, you know exactly which plugin caused it.
This takes about 5 extra minutes per update cycle. That’s the best 5 minutes you’ll ever spend.
Before You Update Anything
Two things need to happen before you touch that update button. Think of these as your safety net.
Make a Backup First
This is non-negotiable. A backup is your undo button – if anything goes wrong, you can put your site back exactly how it was before the update.
I use UpdraftPlus for this, and the free version is enough. Open Settings > UpdraftPlus Backups and click Backup Now. The box that pops up has “Include your database in the backup” and “Include your files in the backup” both ticked by default – leave them that way, then click Backup Now again.
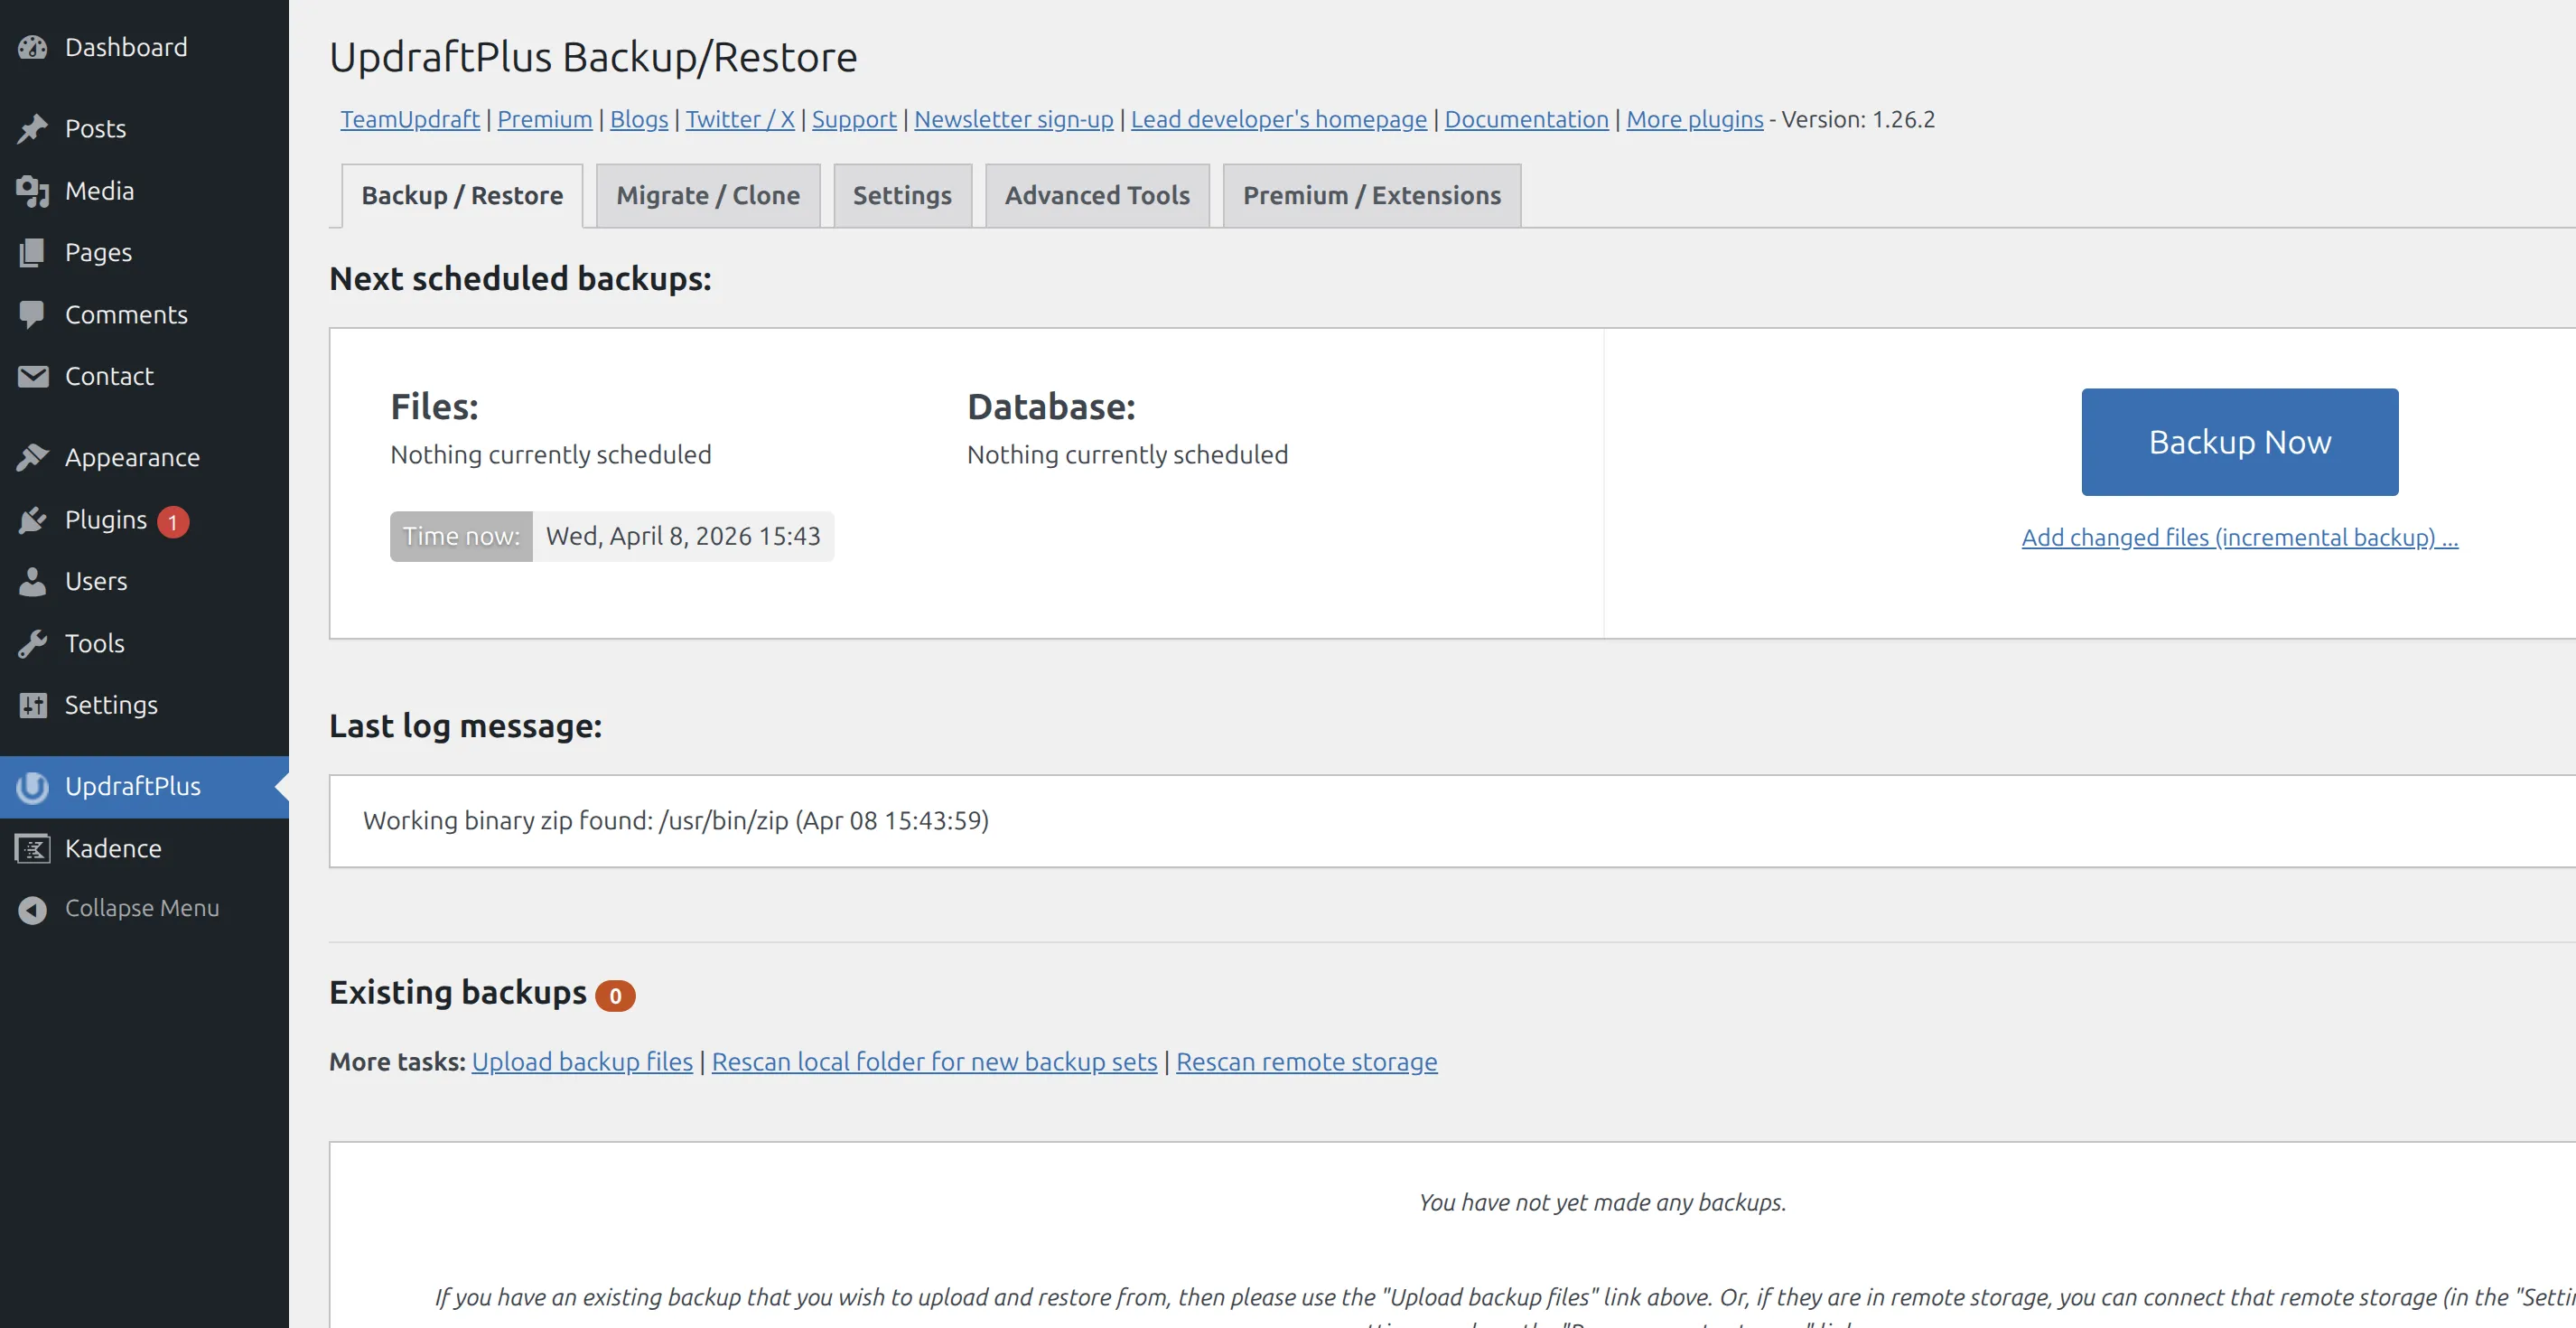
When I tested it, a 933 MB site finished in about 14 seconds on my test server. On cheaper shared hosting, expect it to take longer.
2 things to know before you rely on it. The first time you open UpdraftPlus, a 6-step setup wizard appears, and step 4 has 3 extra plugins pre-ticked for install – untick them unless you want them. And backups stay on your own server unless you connect remote storage like Google Drive, so if the server itself fails, a local-only backup goes down with it. I compared UpdraftPlus with 5 other free options in the best free WordPress backup plugins.
Install WP Rollback (Optional but Recommended)
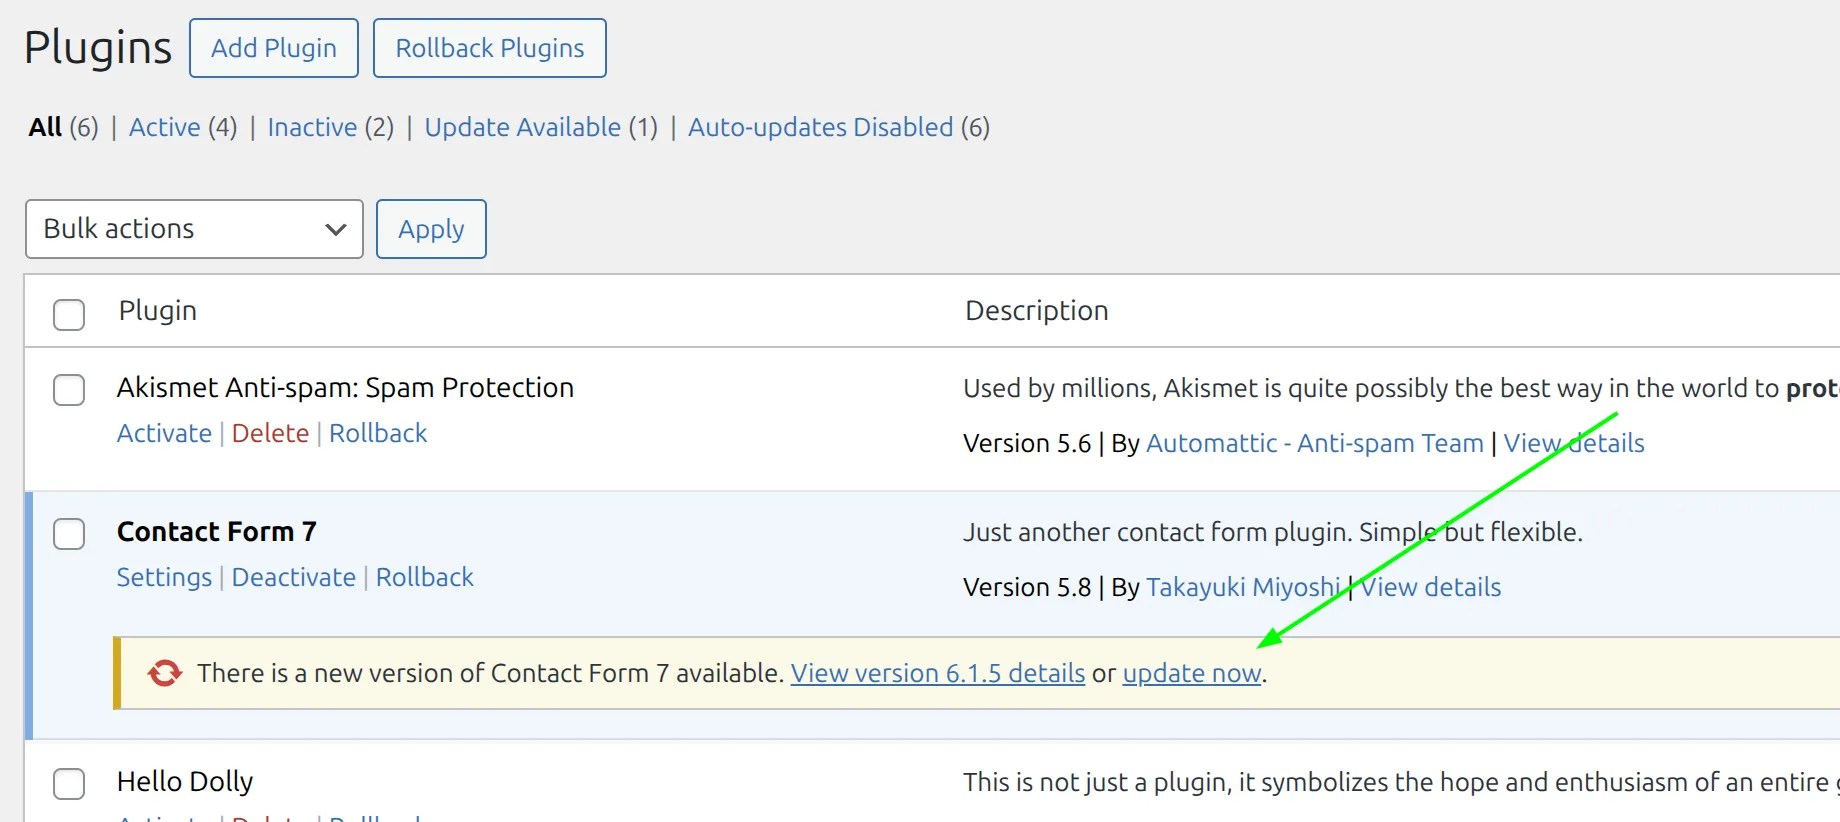
WP Rollback is a free plugin that adds a Rollback link under each plugin on your Plugins page. If an update breaks something, you click Rollback, pick the previous version number, and it reinstalls that version of that one plugin. No full backup restore needed.
I consider it a must-have, especially when you don’t want to restore your entire site because one plugin update went bad. Here’s how to set it up:
- Go to Plugins > Add Plugin and search for “WP Rollback”
- Install and activate it
- You’ll now see a Rollback link under each plugin on the Plugins page
Clicking that link opens Tools > WP Rollback with a list of every earlier version from WordPress.org. For Kadence Blocks, that list ran to 385 versions on my test site.
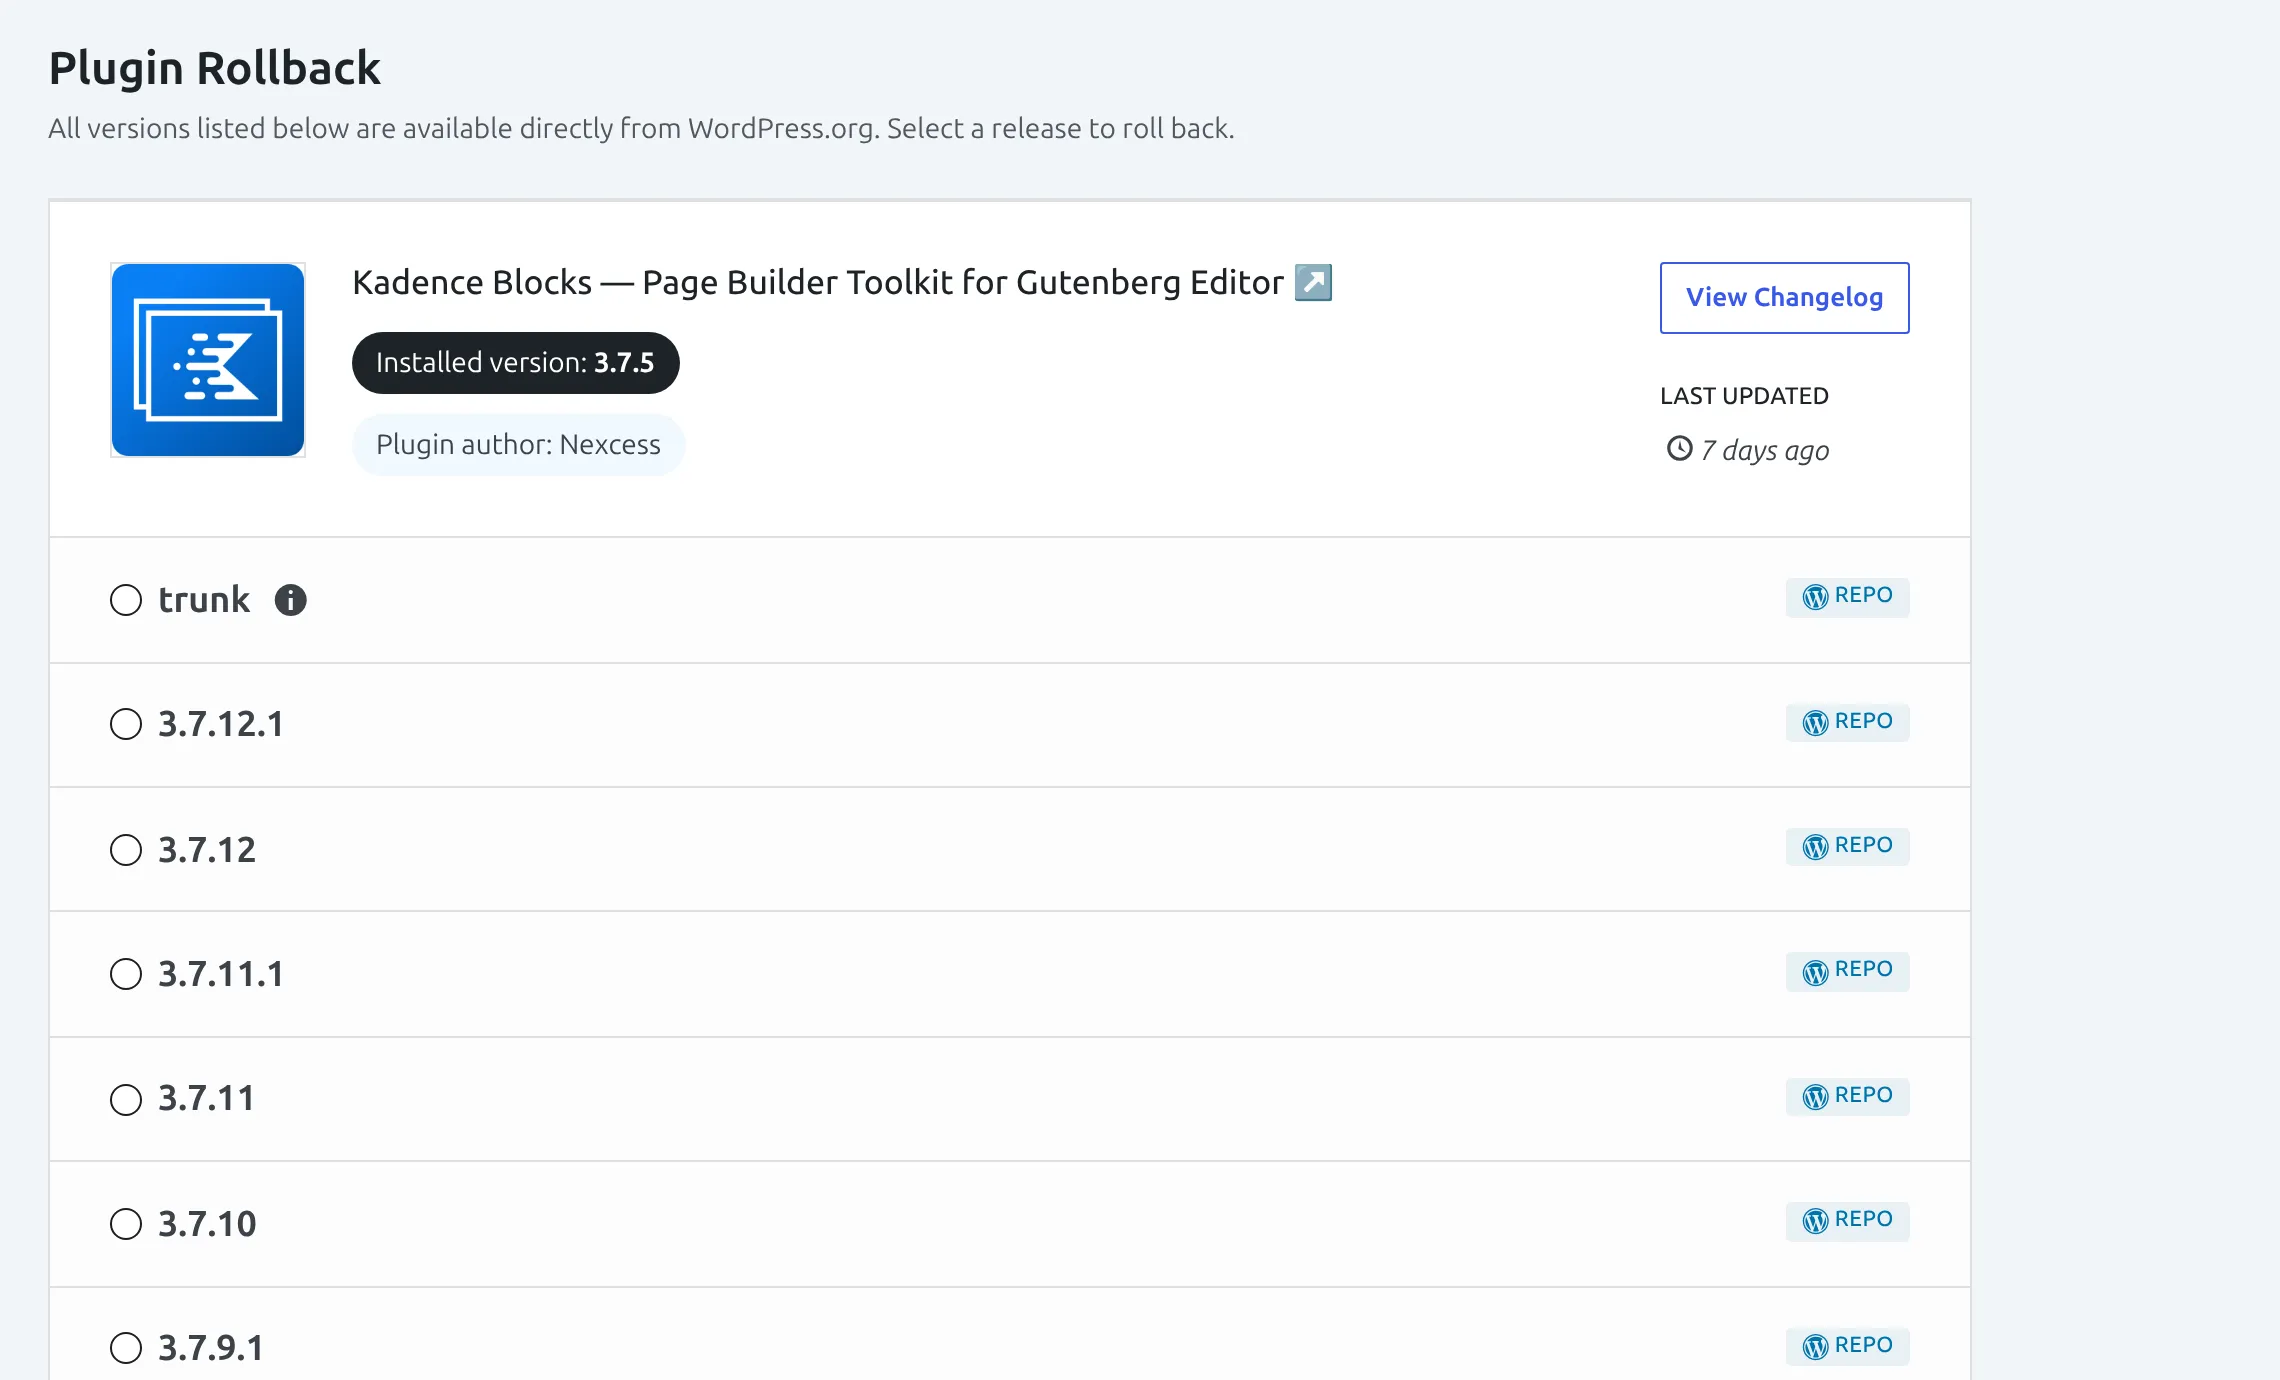
One limit worth knowing: the free version only rolls back plugins and themes that come from WordPress.org. For premium plugins you bought elsewhere (Elementor Pro, Gravity Forms, Kadence Pro and so on), WP Rollback asks you to upgrade to its Pro version. For those, your backup is the rollback plan.
The Safe Update Process (Step by Step)
Here’s the exact process I follow every time I update WordPress plugins safely. It works for 5 plugins or 25.
- Make a backup – open UpdraftPlus, click Backup Now, wait for it to finish
- Pick one plugin – start with the smallest or least critical one
- Click “update now” in that plugin’s update notice
- Check your site – open your homepage, a blog post, and at least one important page (contact form, checkout, or landing page)
- If it works: move to the next plugin and repeat from step 3
- If something breaks: click Rollback on that plugin (or restore your backup if the problem is severe)
- Repeat until every plugin is updated
The whole process takes 10-15 minutes for a site with 12-15 plugins. Compare that to the 2+ hours you’d spend debugging a batch update gone wrong. And if you ever get stuck on a “Briefly unavailable for scheduled maintenance” screen mid-update, here’s why it clears itself within 10 minutes.
What Should I Update First?
Order matters. Start with low-risk plugins and work up to the ones that could cause the most damage.
| Update order | Why |
|---|---|
| Small utility plugins (redirects, analytics, security) | Low risk – quick to check |
| SEO plugin (Rank Math or Yoast) | Check that your posts still show meta titles and descriptions |
| Form plugins (WPForms, Fluent Forms) | Test that your forms still submit a test entry |
| Caching plugin (WP Rocket, LiteSpeed Cache) | Clear your cache after updating this one |
| Your theme | Check layout on both desktop and mobile |
| WooCommerce + add-ons | Test product pages and the full checkout last – highest risk |
| WordPress core | Update this after all plugins are current |
WooCommerce goes near the end because it touches the most parts of your site – product pages, cart, checkout, account pages, and email notifications. If a WooCommerce update breaks something, you want every other plugin already stable so you’re not chasing 2 problems at once.
WordPress core goes last in my routine. Plugin developers usually release compatibility fixes before or right after a core release, so having every plugin current first means those fixes are already on your site when core updates.
Should I Enable Auto-Updates?
WordPress lets you switch auto-updates on for each plugin individually. It’s a useful feature, but only for the right plugins.
Turn auto-updates ON for:
- Simple utility plugins – redirects, analytics trackers, small security tweaks
- Plugins that rarely cause conflicts – anything that doesn’t touch your front-end layout or critical features
Keep auto-updates OFF for:
- WooCommerce and its extensions
- Page builders (Elementor, Kadence Blocks, Beaver Builder)
- Form plugins that handle leads or payments
- Your theme
- Any plugin that runs a core part of your business
To switch it on, go to your Plugins page and look at the Automatic Updates column on the right. Click Enable auto-updates next to each plugin you trust (the link changes to “Disable auto-updates” so you can turn it off again).
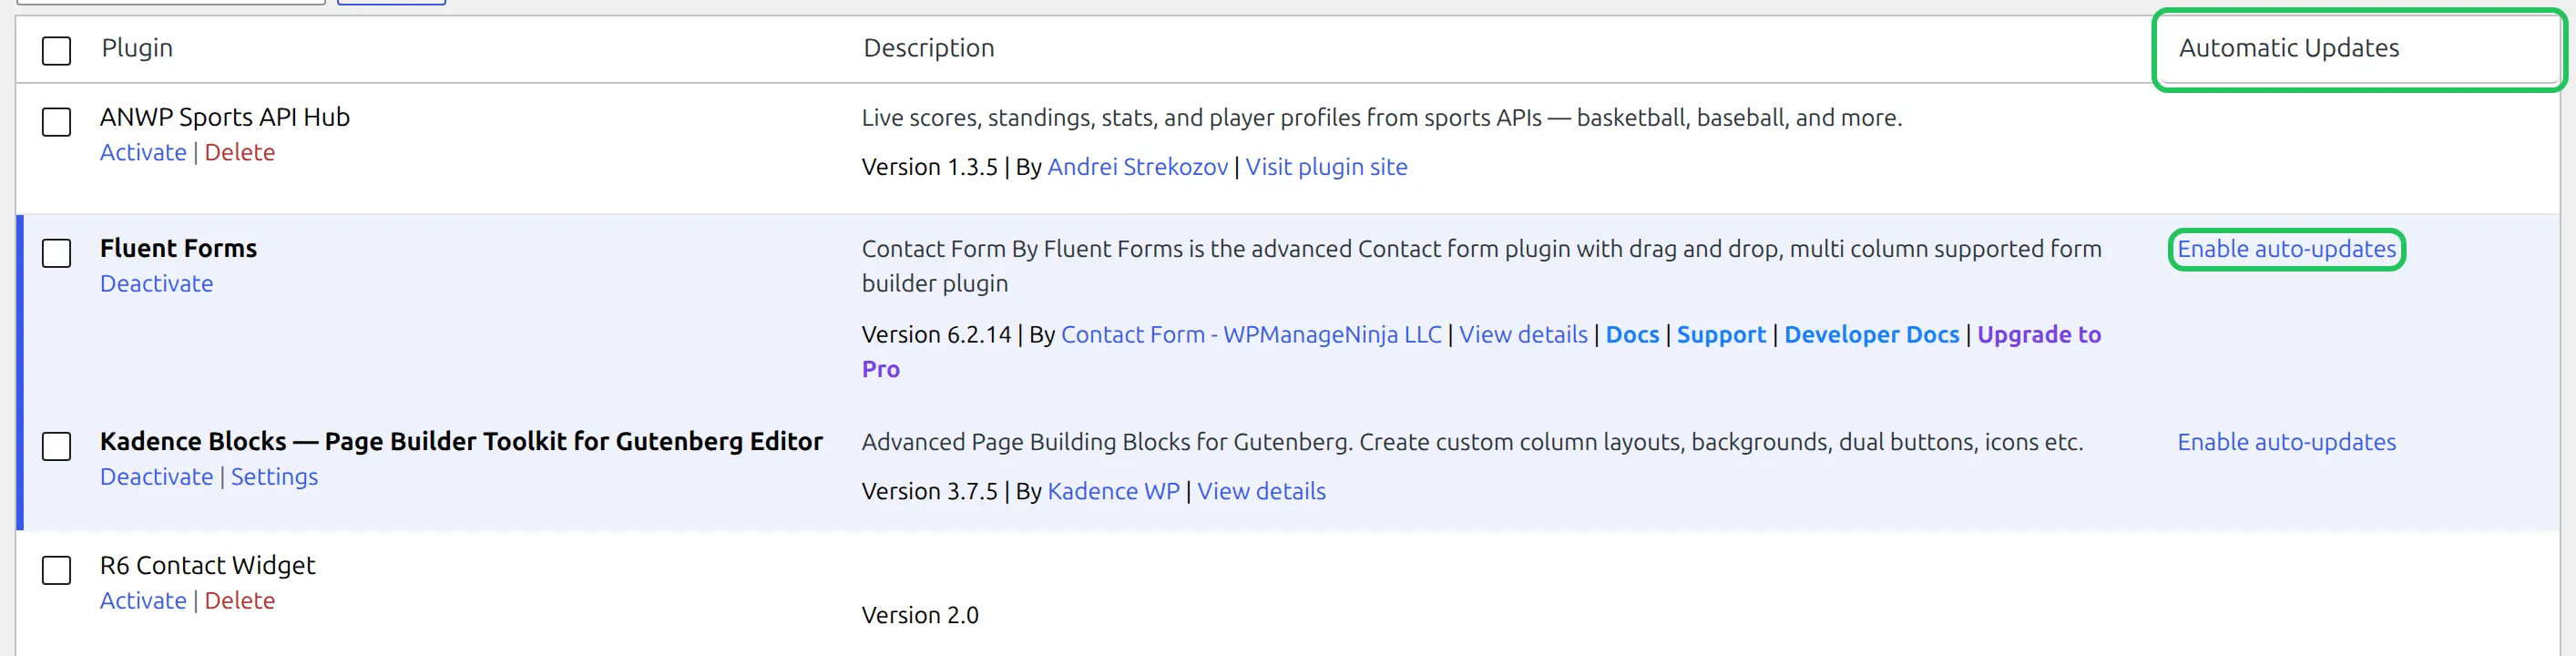
Here’s a safety net most people don’t know about. Since WordPress 6.6, when an active plugin auto-updates, WordPress immediately checks the site for a fatal error, and if it finds one, it puts the previous version back on its own. But it only catches crashes. A layout that quietly shifts or a form that stops sending email gets past it, which is why the big plugins on the OFF list still deserve a manual update and a quick check.
What If My Site Is Already Broken From an Update?
If you’re reading this because something already broke, here’s how to recover depending on how bad the damage is.
You Can Still Access the Dashboard
This is the easiest fix. Go to Plugins and deactivate the plugin you updated most recently. Check if the site works again. If it does, that plugin was the problem – either roll it back to the previous version with WP Rollback, or leave it deactivated and contact the plugin developer.
If you’re seeing JSON response errors or other odd behavior, try deactivating the last 2-3 plugins you updated. Reactivate them one at a time to find the conflict.
The Dashboard Is Broken Too
If the update caused a fatal error, your site shows “There has been a critical error on this website.” I recreated that on my test site with a deliberately broken plugin. Logged-in admins see an extra line: “Please check your site admin email inbox for instructions.”
Check that inbox first. WordPress emails the site’s admin address a message titled “Your Site is Experiencing a Technical Issue”. It names the plugin that crashed and includes a special login link for recovery mode. The link works for 1 day, and a new one is sent if the error happens again after that.
Click it, log in, and you’re in your normal dashboard with the broken plugin paused – it’s switched off just for you, so you can deactivate it, while visitors still see the error until you do.
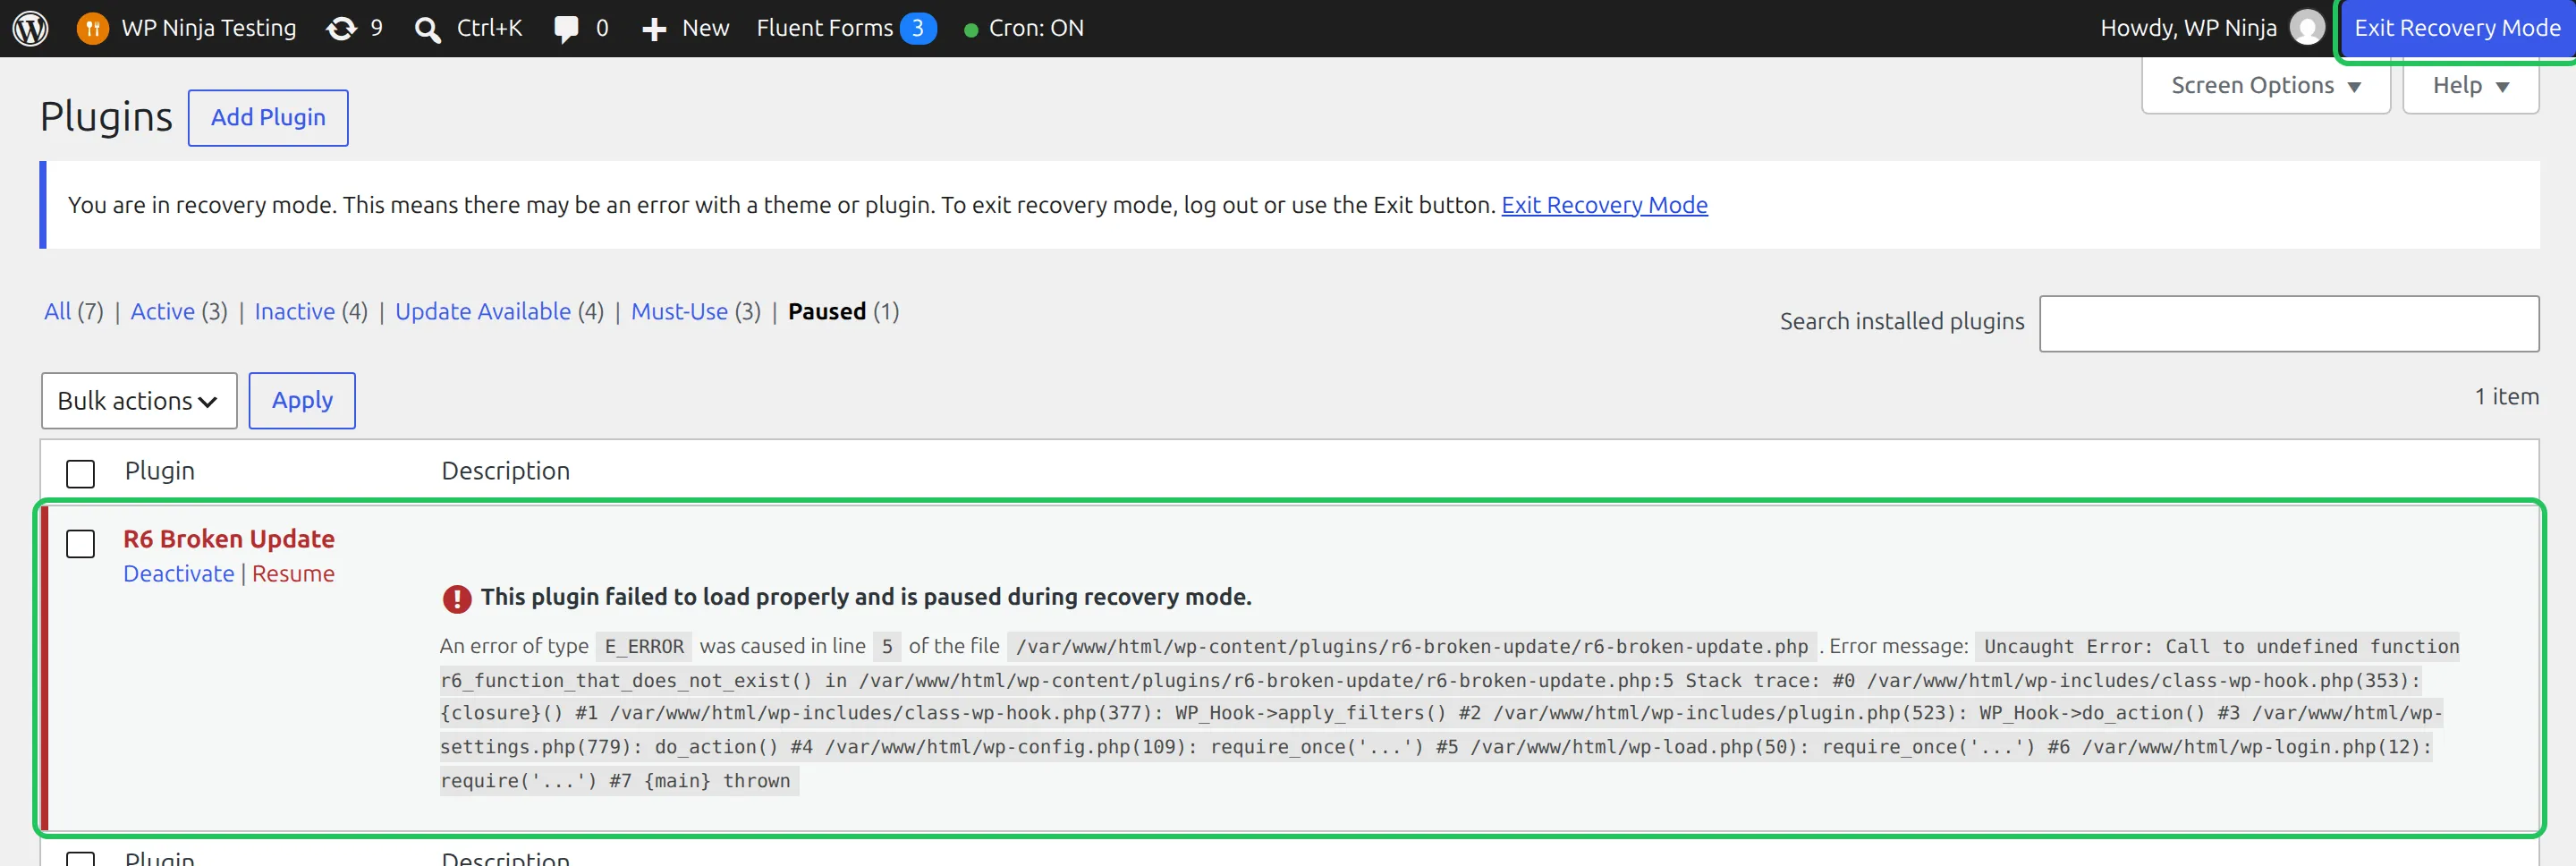
No email? (Not every host sends WordPress emails reliably.) Then disable the plugin through your hosting File Manager or FTP:
- Log into your hosting control panel (cPanel, Plesk, or your host’s file manager)
- Go to
/wp-content/plugins/ - Find the folder of the plugin you just updated
- Rename it – add
-disabledto the end (for example,woocommercebecomeswoocommerce-disabled)
I tested this too. The plugin stops loading the moment the folder is renamed. The next time you open the Plugins page, WordPress deactivates it properly and tells you why:

From there, rename the folder back and roll the plugin back with WP Rollback, or restore your backup.
Nothing Works at All
If your entire site is down and neither recovery mode nor renaming a folder helps – a white screen, a 500 error, or a database connection error – restore from your UpdraftPlus backup. If you set up UpdraftPlus to send backups to cloud storage (Google Drive or Dropbox), you can still get to the backup files even when WordPress itself won’t load.
No backup? Contact your hosting provider. Your host may keep its own server-level backups, and how far back they go varies by host and plan.
Ask them to restore your site to the last snapshot before the update. It’s not ideal, but it’s better than starting from scratch.
Use a Staging Site (The Professional Way)
A staging site is a private copy of your live website. You can update plugins, test new features, and break things on it without affecting your real visitors. Once everything checks out on staging, you push the changes to your live site.
This is how professional developers handle updates. And the good news is you don’t need to be a developer to use one.
Some hosts include one-click staging. On SiteGround, for example, it’s under Site Tools > WordPress > Staging. On other hosts, search your hosting dashboard or help docs for “staging.”
The process is simple. Create the staging copy, update your plugins there, test everything, and then push to live. It adds about 10 minutes to your update routine, but it means your live site never touches an untested update.
If your host doesn’t offer staging, the free WP Staging plugin creates a copy of your site in a subfolder. It’s not as clean as host-level staging, but it works.
Keep a Simple Update Log
One last tip that’s saved me more than once. I keep a text file called “update-log.txt” on my desktop. Every time I run updates, I jot down the date, which plugins I updated, and which versions they went to. It takes 30 seconds.
Why? Because sometimes a plugin update causes a subtle problem you don’t notice for 3 days – a form that silently stopped sending emails, or a page that loads 2 seconds slower. When you have a log, you can look back and say “I updated Plugin X on Tuesday – that’s when this started.” Without a log, you’re guessing. If your site suddenly feels sluggish after updates, my guide on why your WordPress site is so slow covers the diagnostics.
Frequently Asked Questions
How do I update a WordPress plugin without losing my customizations?
Anything you set in the plugin’s own settings screens survives an update, because those settings live in your database. Edits made directly to a plugin’s files are wiped by the next update, so never customize plugin files – put custom CSS in your theme’s Additional CSS box instead.
Will updating a plugin delete my settings or data?
A normal update replaces the plugin’s files and leaves your settings and content alone, because those are stored in your WordPress database. Still, run a backup first – a buggy update can change data in ways a rollback of the files won’t undo.
What should I do if a plugin update fails?
If the update itself fails to install, WordPress 6.3 and later puts the previous version back automatically. If the site gets stuck on “Briefly unavailable for scheduled maintenance,” wait 10 minutes or delete the .maintenance file in your site’s root folder. If the update installed but broke the site, use the recovery mode email or rename the plugin’s folder, as described above.
Should I turn on automatic updates for WordPress plugins?
I only enable auto-updates for small utility plugins that rarely cause conflicts. WordPress now rolls back an auto-update that crashes the site, but it can’t spot a broken layout or a form that stopped sending, so I update WooCommerce, page builders and form plugins by hand and check the site right away.
Quick Recap
Here’s the short version you can bookmark:
- Back up your site with UpdraftPlus (and send the backup off the server)
- Install WP Rollback as your safety net for WordPress.org plugins
- Update one plugin at a time
- Check your site after each update
- Roll back straight away if something breaks
- Save WooCommerce and WordPress core for last
- If the site crashes, look for the recovery mode email before you reach for FTP
- Use a staging site if your host offers one
Plugin updates don’t have to be stressful. With the one-by-one method and a rollback plan, you’re in control the entire time. And if something does go wrong, you’re 2 or 3 clicks away from undoing it.